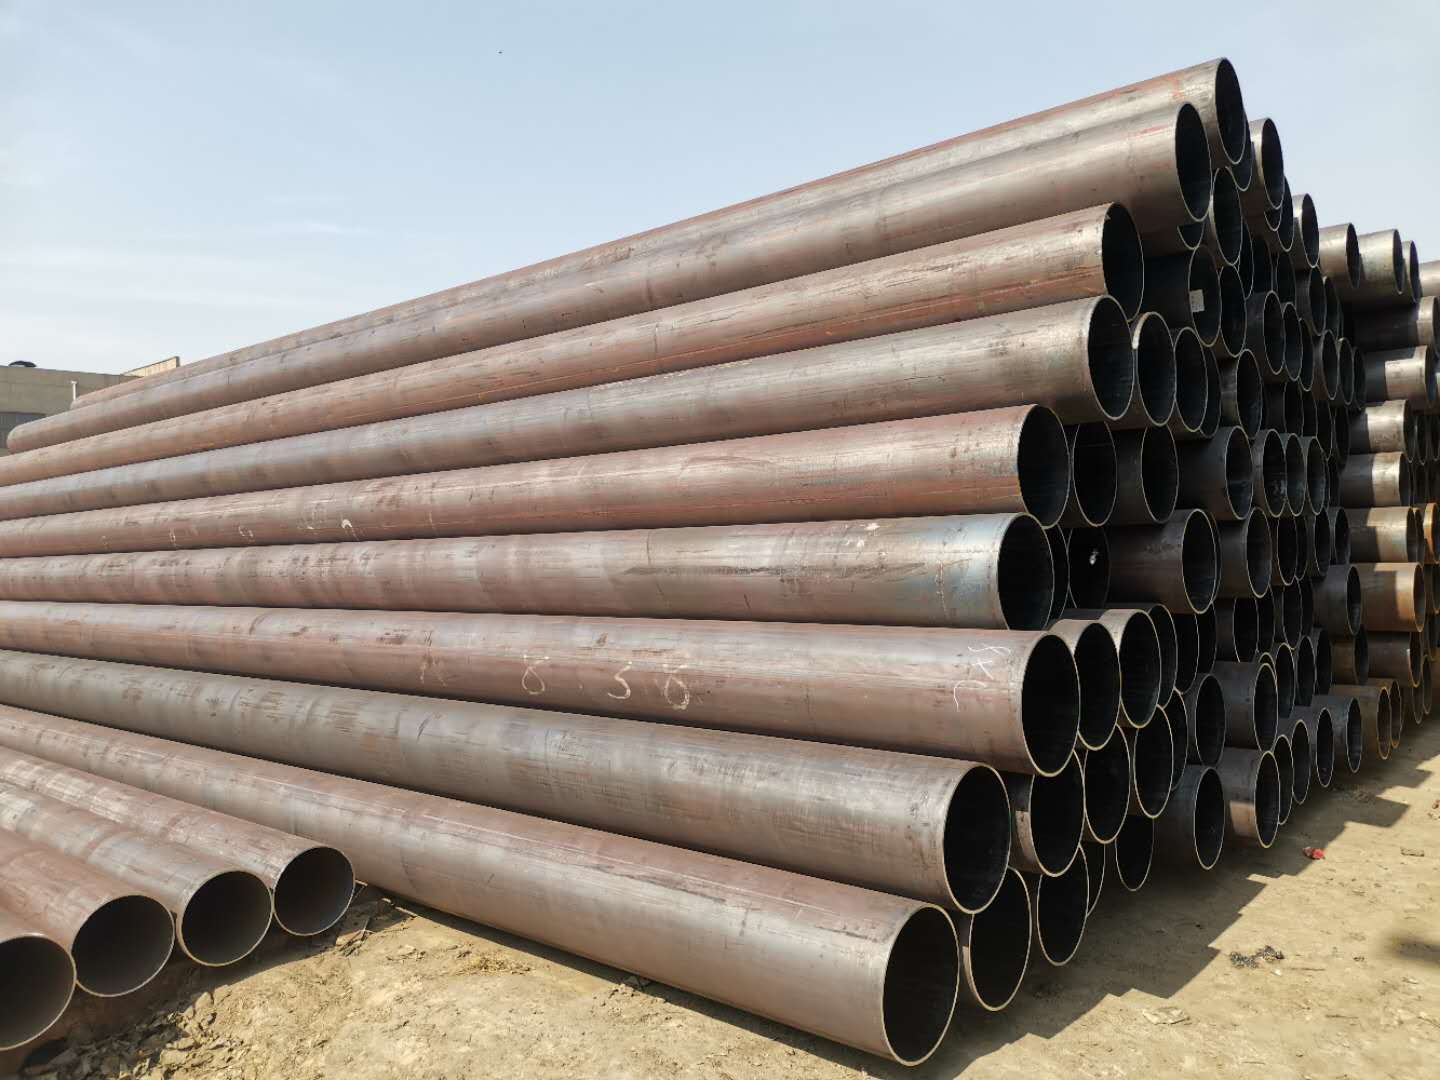
AS/NZS 1163 specifies cold-formed, resistance-welded, structural steel hollow pipe sections for general structural and engineering applications without subsequent heat treatment.
Standard systems applicable to Australia and New Zealand.

Navigation Buttons
Classification by Cross-section Shape
AS/NZS 1163 Intermediate Grade Classification
Raw Material
Manufacturing Process
AS/NZS 1163 Chemical Composition
AS/NZS 1163 Tensile Test
AS/NZS 1163 Impact Test
Cold Flattening Test
Non-destructive Examination
Tolerances for Shape and Mass
Tolerance of Length
AS/NZS 1163 SSHS List of Pipe Size and Weight Tables Included
Repair of Exterior and Cosmetic Defects
Galvanized
AS/NZS 1163 Marking
Applications of AS/NZS 1163
Our Related Products
Classification by Cross-section Shape
Three types in AS/NZS 1163 can be categorized according to the shape of the cross-section, which are:
Circular hollow sections (CHS)
Rectangular hollow sections (RHS)
Square Hollow Sections (SHS)
The focus of this article is to summarize the requirements for steel tubes with circular hollow sections.
AS/NZS 1163 Intermediate Grade Classification
Three grades in AS/NZS 1163 based on the minimum yield strength (MPA) of the finished product:
C250, C350 and C450.
Corresponding to the 0 ℃ low-temperature impact test grade that the steel pipe can meet:
C250L0, C350L0 and C450L0.
The standard also stipulates that the correct way to express the grade of steel pipe is:
AS/NZS 1163-C250 or AS/NZS 1163-C250L0
Raw Material
hot-rolled coil or Cold-rolled coil
The cold-rolled coil is a hot-rolled coil that has been subjected to a cold-rolling reduction of more than 15%. The coil shall have a subcritical annealing cycle that recrystallizes the structure and forms new ferrite grains. The resulting properties are similar to a hot-rolled coil.
Fine-grained steel is specified as the raw material for steel coils. Steels that have an austenitic grain size of number 6 or finer when tested in accordance with AS 1733.
This steel is produced by the Basic Oxygen Method (BOS) or Electric Arc Furnace (EAF) processes and may be refined by Vacuum Arc Remelting (VAR), Electroslag Remelting (ESR), or by secondary steelmaking processes such as Vacuum Degassing or Calcium Injection.
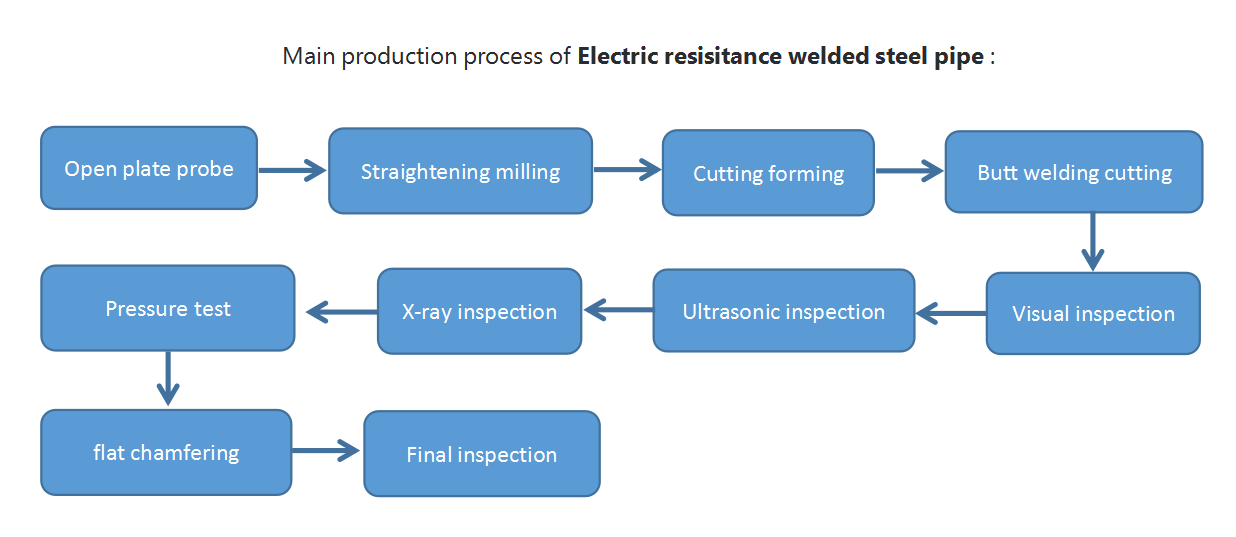
Manufacturing Process
The finished hollow section product shall be manufactured by the cold-forming process and use electric resistance-welding (ERW) techniques to join the strip edges.
The weld seam is to be longitudinal and shall have the external upset removed.
There shall be no subsequent overall heat treatment on the finished product.

AS/NZS 1163 Chemical Composition
AS/NZS 1163 in the chemical composition testing is divided into two cases:
one case is the raw materials for chemical composition testing,
the other is the finished steel pipe inspection.
Casting Analysis of Steel
A cast analysis of the steel shall be made from each heat to determine the proportions of the specified elements.
In cases where it is impracticable to obtain samples from the liquid steel, analysis on test samples taken in accordance with AS/NZS 1050.1 or ISO 14284 may be reported as cast analysis.
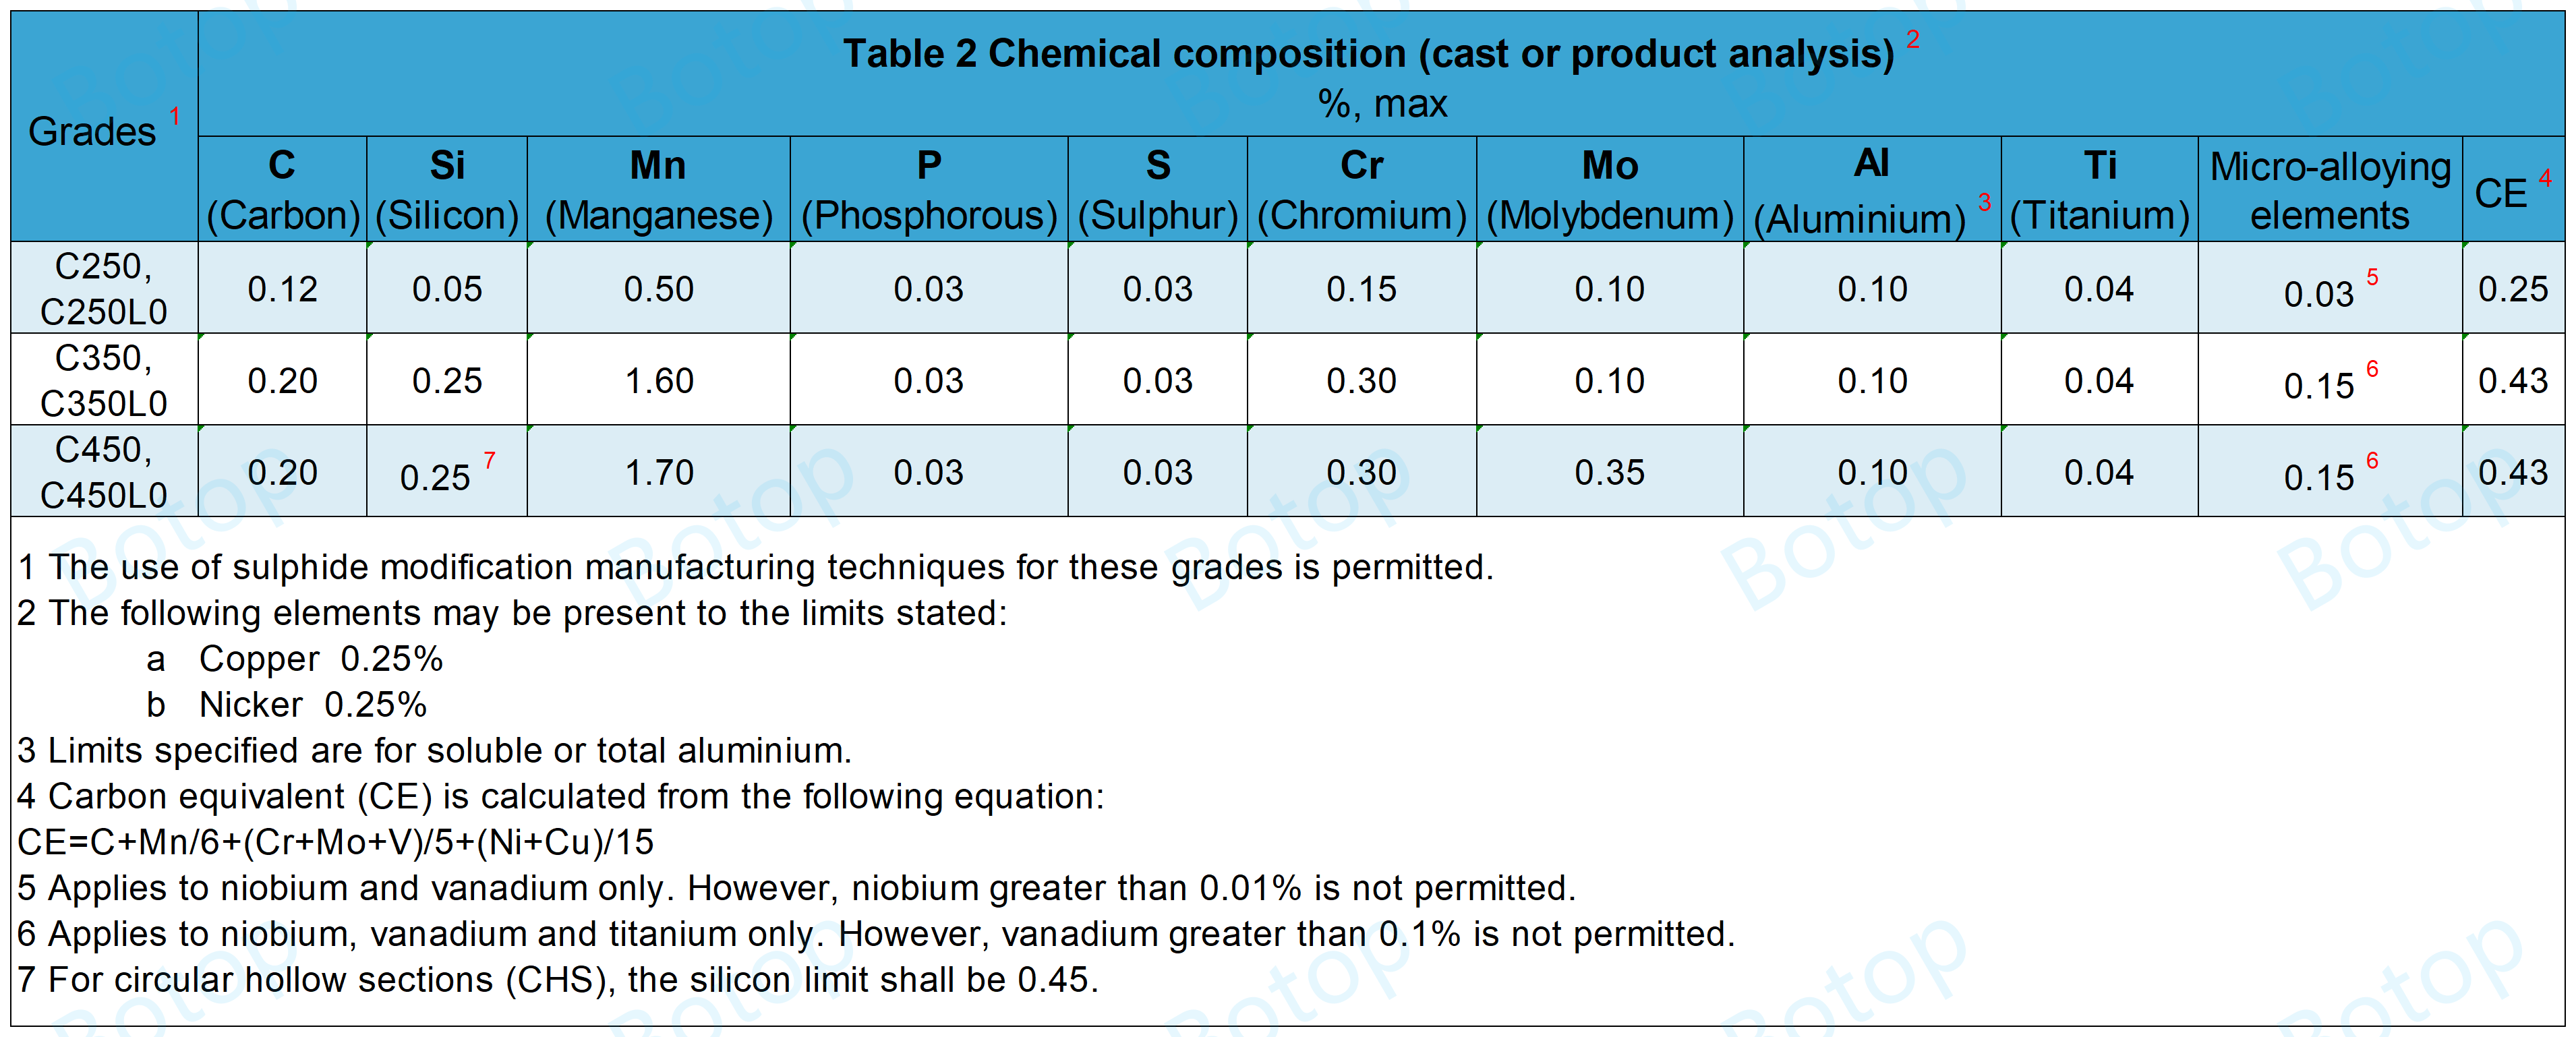
The cast analysis of steel shall comply with the limits for the appropriate grade given in Table 2.

Chemical Analysis of the Finished Product
AS/NZS 1163 does not mandate chemical composition testing of the final product.
If testing is carried out, it should comply with the limits given in Table 2 and the tolerances given in Table 3.
| TABLE 3 Product analysis tolerances for grades given in Table 2 | |
| Element | Tolerance over the maximum limit |
| C (Carbon) | 0.02 |
| Si (Silicon) | 0.05 |
| Mn (Manganese) | 0.1 |
| P (Phosphorous) | 0.005 |
| S (Sulphur) | 0.005 |
| Cr (Chromium) | 0.05 |
| Ni (Nickel) | 0.05 |
| Mo (Molybdenum) | 0.03 |
| Cu (Copper) | 0.04 |
| AI (Aluminium) (total) | -0.005 |
| Micro-alloying elements (niobium and vanadium only) for Grades C250, C250L0 | 0.06 with niobium no greater than 0.020 |
| Micro-alloying elements (niobium, vanadium, and titanium only) for Grades C350, C350L0, C450, C450L0 | 0.19 with vanadium no greater than 0.12 |
AS/NZS 1163 Tensile Test
Experimental method: AS 1391.
Prior to the tensile test, the specimen shall be heated to a temperature of not less than 15 min by heating to a temperature of between 150°C and 200°C.
| Grade | Minimum yield strength |
Minimum tensile strength |
Minimum elongation as a proportion of the gauge length of 5.65√S0 |
||
| do/t | |||||
| ≤ 15 | >15 ≤30 | >30 | |||
| MPA | MPA | % | |||
| C250, C250L0 |
250 | 320 | 18 | 20 | 22 |
| C350, C350L0 |
350 | 430 | 16 | 18 | 20 |
| C450, C450L0 |
450 | 500 | 12 | 14 | 16 |
AS/NZS 1163 Impact Test
Experimental method: at 0°C according to AS 1544.2.
Prior to the impact test, the specimen shall be heated by heating to between 150°C and 200°C for not less than 15 min.
| Grade | Test temperature | Minimum absorbed energy, J | |||||
| Size of the test piece | |||||||
| 10mm×10mm | 10mm×7.5mm | 10mm×5mm | |||||
| Average of 3 tests |
Individual test |
Average of 3 tests |
Individual test |
Average of 3 tests |
Individual test |
||
| C250L0 C350L0 C450L0 |
0℃ | 27 | 20 | 22 | 16 | 18 | 13 |
Cold Flattening Test
The test piece shall be flattened until the distance between the surfaces is 0.75 do or less.
Shall show no signs of cracks or defects.
Non-destructive Examination
As a non-mandatory item, welds in hollow sections of welded structures may be subjected to non-destructive examination (NDE).
Tolerances for Shape and Mass
| Type | Range | Tolerance |
| Characteristic | — | Circular hollow sections |
| External dimensions(do) | — | ±1%, with a minimum of ±0.5 mm and a maximum of ±10 mm |
| Thickness (t) | do≤406,4 mm | 土10% |
| do>406.4 mm | ±10% with a max of ±2 mm | |
| Out-of-roundness (o) | Outer diameter(bo)/wall thickness(t)≤100 | ±2% |
| Straightness | total length | 0.20% |
| Mass (m) | specified weight | ≥96% |
Thickness:
The thickness (t) shall be measured at a position of not less than 2t (Meaning of 2x wall thickness)or 25 mm, whichever is lesser, from the weld seam.
out-of-roundness:
The out-of-roundness (o) is given by:o=(domax-domin)/do×100
Tolerance of Length
| Type of length | Range m |
Tolerance |
| Random length | 4m to 16m with a range of 2m per order item |
10% of sections supplied may be below the minimum for the ordered range but not less than 75% of the minimum |
| unspecified length | ALL | 0-+100mm |
| Precision length | ≤ 6m | 0-+5mm |
| >6m ≤10m | 0-+15mm | |
| >10m | 0-+(5+1mm/m)mm |
AS/NZS 1163 SSHS List of Pipe Size and Weight Tables Included
In AS/NZS 1163, lists of common cold-formed structural hollow sections (SSHS) in Australia and New Zealand are provided.
These lists provide section names, respective nominal sizes, section characteristics, and qualities.
| Outside Diameter | Thickness | Massperunitlength | External surface area |
Ratio | |
| do | t | per unit length | per unit mass | ||
| mm | mm | kg/m | m²/m | m²/t | do/t |
| 610.0 | 12.7CHS | 187 | 1.92 | 10.2 | 48.0 |
| 610.0 | 9.5CHS | 141 | 1.92 | 13.6 | 64.2 |
| 610.0 | 6.4CHS | 95.3 | 1.92 | 20.1 | 95.3 |
| 508.0 | 12.7CHS | 155 | 1.60 | 10.3 | 40.0 |
| 508.0 | 9.5CHS | 117 | 1.60 | 13.7 | 53.5 |
| 508.0 | 6.4CHS | 79.2 | 1.60 | 20.2 | 79.4 |
| 457.0 | 12.7CHS | 139 | 1.44 | 10.3 | 36.0 |
| 457.0 | 9.5CHS | 105 | 1.44 | 13.7 | 48.1 |
| 457.0 | 6.4CHS | 71.1 | 1.44 | 20.2 | 71.4 |
| 406.4 | 12.7CHS | 123 | 1.28 | 10.4 | 32.0 |
| 406.4 | 9.5CHS | 93.0 | 1.28 | 13.7 | 42.8 |
| 406.4 | 6.4CHS | 63.1 | 1.28 | 20.2 | 63.5 |
| 355.6 | 12.7CHS | 107 | 1.12 | 10.4 | 28.0 |
| 355.6 | 9.5CHS | 81.1 | 1.12 | 13.8 | 37.4 |
| 355.6 | 6.4CHS | 55.1 | 1.12 | 20.3 | 55.6 |
| 323.9 | 2.7CHS | 97.5 | 1.02 | 10.4 | 25.5 |
| 323.9 | 9.5CHS | 73.7 | 1.02 | 13.8 | 34.1 |
| 323.9 | 6.4CHS | 50.1 | 1.02 | 20.3 | 50.6 |
| 273.1 | 9.3CHS | 60.5 | 0.858 | 14.2 | 29.4 |
| 273.1 | 6.4CHS | 42.1 | 0.858 | 20.4 | 42.7 |
| 273.1 | 4.8CHS | 31.8 | 0.858 | 27.0 | 56.9 |
| 219.1 | 8.2CHS | 42.6 | 0.688 | 16.1 | 26.7 |
| 219.1 | 6.4CHS | 33.6 | 0.688 | 20.5 | 34.2 |
| 219.1 | 4.8CHS | 25.4 | 0.688 | 27.1 | 45.6 |
| 168.3 | 71CHS | 28.2 | 0.529 | 18.7 | 23.7 |
| 168.3 | 6.4CHS | 25.6 | 0.529 | 20.7 | 26.3 |
| 168.3 | 4.8CHS | 19.4 | 0.529 | 27.3 | 35.1 |
| 165.1 | 5.4CHS | 21.3 | 0.519 | 24.4 | 30.6 |
| 165.1 | 5.0CHS | 19.7 | 0.519 | 26.3 | 33.0 |
| 165.1 | 3.5CHS | 13.9 | 0.519 | 37.2 | 47.2 |
| 165.1 | 3.0CHS | 12.0 | 0.519 | 43.2 | 55.0 |
| 139.7 | 5.4CHS | 17.9 | 0.439 | 24.5 | 25.9 |
| 139.7 | 5.0CHS | 16.6 | 0.439 | 26.4 | 27.9 |
| 139.7 | 3.5CHS | 11.8 | 0.439 | 37.3 | 39.9 |
| 139.7 | 3.0CHS | 10.1 | 0.439 | 43.4 | 46.6 |
| 114.3 | 6.0CHS | 16.0 | 0.359 | 22.4 | 19.1 |
| 114.3 | 5.4CHS | 14.5 | 0.359 | 24.8 | 21.2 |
| 114.3 | 4.8CHS | 13.0 | 0.359 | 27.7 | 23.8 |
| 114.3 | 4.5CHS | 12.2 | 0.359 | 29.5 | 25.4 |
| 114.3 | 3.6CHS | 9.83 | 0.359 | 36.5 | 31.8 |
| 114.3 | 3.2CHS | 8.77 | 0.359 | 41.0 | 35.7 |
| 101.6 | 5.0CHS | 11.9 | 0.319 | 26.8 | 20.3 |
| 101.6 | 4.0CHS | 9.63 | 0.319 | 33.2 | 25.4 |
| 101.6 | 3.2CHS | 7.77 | 0.319 | 41.1 | 31.8 |
| 101.6 | 2.6CHS | 6.35 | 0.319 | 50.3 | 39.1 |
| 88.9 | 5.9CHS | 12.1 | 0.279 | 23.1 | 15.1 |
| 88.9 | 5.0CHS | 10.3 | 0.279 | 27.0 | 17.8 |
| 88.9 | 5.5CHS | 11.3 | 0.279 | 24.7 | 16.2 |
| 88.9 | 4.8CHS | 9.96 | 0.279 | 28.1 | 18.5 |
| 88.9 | 4.0CHS | 8.38 | 0.279 | 33.3 | 22.2 |
| 88.9 | 3.2CHS | 6.76 | 0.279 | 41.3 | 27.8 |
| 88.9 | 2.6CHS | 5.53 | 0.279 | 50.5 | 34.2 |
| 76.1 | 5.9CHS | 10.2 | 0.239 | 23.4 | 12.9 |
| 76.1 | 4.5CHS | 7.95 | 0.239 | 30.1 | 16.9 |
| 76.1 | 3.6CHS | 6.44 | 0.239 | 37.1 | 21.1 |
| 76.1 | 3.2CHS | 5.75 | 0.239 | 41.6 | 23.8 |
| 76.1 | 2.3CHS | 4.19 | 0.239 | 57.1 | 33.1 |
| 60.3 | 5.4CHS | 7.31 | 0.189 | 25.9 | 11.2 |
| 60.3 | 4.5CHS | 6.19 | 0.189 | 30.6 | 13.4 |
| 60.3 | 3.6CHS | 5.03 | 0.189 | 37.6 | 16.8 |
| 48.3 | 5.4CHS | 5.71 | 0.152 | 26.6 | 8.9 |
| 48.3 | 4.0CHS | 4.37 | 0.152 | 34.7 | 12.1 |
| 48.3 | 3.2CHS | 3.56 | 0.152 | 42.6 | 15.1 |
| 42.4 | 4.9CHS | 4.53 | 0.133 | 29.4 | 8.7 |
| 42.4 | 4.0CHS | 3.79 | 0.133 | 35.2 | 10.6 |
| 42.4 | 3.2CHS | 3.09 | 0.133 | 43.1 | 13.3 |
Repair of Exterior and Cosmetic Defects
Appearance
The finished product is free of defects detrimental to the structural integrity of the material.
Removal of Surface Defects
When surface defects are removed by sanding, the sanded area shall have a good transition.
The remaining wall thickness in the sanded area shall be not less than 90% of the nominal thickness.
Weld Repair of Surface Defects
Welds shall be sound, the weld being thoroughly fused without undercutting or overlap.
The weld metal shall project at least 1.5 mm above the rolled surface and the projecting metal shall be removed by grinding flush with the rolled surface.
Galvanized
Galvanized round hollow sections with an outside diameter of ≤ 60.3 mm and other shaped hollow sections of equivalent dimensions shall be able to withstand a 90° bend around the grooved mandrel.
The galvanized coating shall show no signs of cracks or defects after the bending operation.
AS/NZS 1163 Marking
The following appears at least once in the steel pipe marking.
(a) The manufacturer's name or mark, or both.
(b) The manufacturer's site or mill identification, or both.
(c) Unique, traceable text identification, which shall be in either one or both of the following forms:
(i) The time and date of manufacture of the product.
(ii) A serialized identification number for quality control/assurance and traceability purposes.
Example:
BOTOP CHINA AS/NZS 1163-C350L0 457×12.7CHS×12000MM PIPE NO.001 HEAT NO.000001
Applications of AS/NZS 1163
Architectural and Engineering Structures: Used in the support structures of buildings, such as high-rise buildings and stadiums.
Transportation Facilities: Used in the construction of bridges, tunnels, and railroad infrastructure.
Oil, gas, and mining: used in the construction of oil rigs, mining equipment, and related conveyor systems.
Other heavy industries: including frame structures for manufacturing plants and heavy machinery.
Our Related Products
We are a high-quality welded carbon steel pipe manufacturer and supplier from China, and also a seamless steel pipe stockist, offering you a wide range of steel pipe solutions!
Tags: as/nzs 1163,chs, structural, erw, suppliers, manufacturers, factories, stockists, companies, wholesale, buy, price, quotation, bulk, for sale, cost.
Post time: Apr-21-2024
