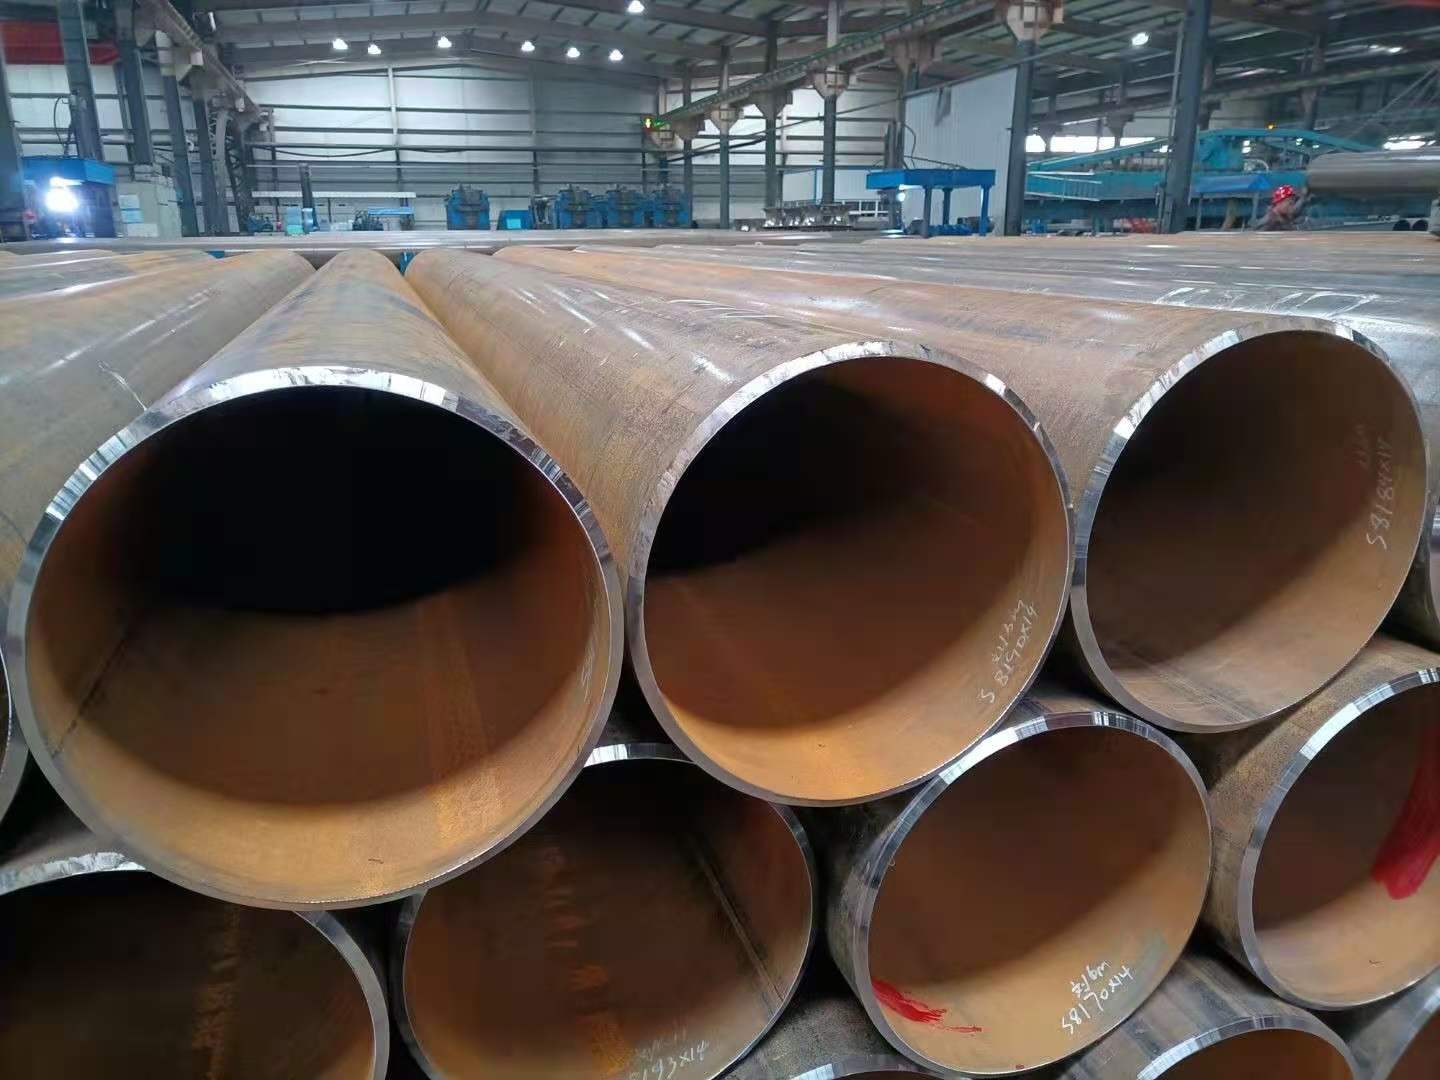
JIS G 3456 steel Pipes are carbon steel tubes are primarily suitable for use in service environments with outside diameters between 10.5 mm and 660.4 mm at temperatures in excess of 350℃.

Navigation Buttons
JIS G 3456 Grade Classification
Raw Materials
JIS G 3456 Manufacturing Processes
Pipe End
Hot Treatment
Chemical Components of JIS G 3456
Tensile Test of JIS G 3456
Flattening Experiment
Bendability Test
Hydraulic Test or Nondestructive Test (NDT)
Pipe Weight Chart and Pipe Schedules of JIS G 3456
Dimensional Tolerances
Appearance
JIS G 3456 Marking
JIS G 3456 Steel Pipe Applications
Standards Related to JIS G 3456
Our Related Products
JIS G 3456 Grade Classification
The JIS G 3456 standard has three grades according to the tensile strength of the pipe.
STPT370,STPT410 and STPT480
They represent tubes with a minimum tensile strength of 370, 410, and 480 N/mm² (MPa) respectively.
Raw Materials
The pipes shall be manufactured from killed steel.
Killed steel is a special type of steel characterized by the addition of specific elements, such as aluminum and silicon, during the melting process to absorb and bind oxygen and other harmful impurities in the steel.
This process effectively removes gases and impurities, thereby improving the purity and uniformity of the steel.
JIS G 3456 Manufacturing Processes
Produced using an appropriate combination of tube manufacturing processes and finishing methods.
| Symbol of grade | Symbol of the manufacturing process | ||
| Pipe manufacturing process | Finishing method | Marking | |
| STPT370 STPT410 STPT480 |
Seamless: S | Hot-finished: H Cold-finished: C |
As given in 13 b). |
| Electric resistance welded: E Butt welded: B |
Hot-finished: H Cold-finished: C As electric resistance welded: G |
||
For STPT 480 grade pipe, only seamless steel pipe shall be used.
If resistance welding is used, the welds on the inner and outer surfaces of the pipe shall be removed to obtain a smooth weld.
Pipe End
The pipe should be flat end.
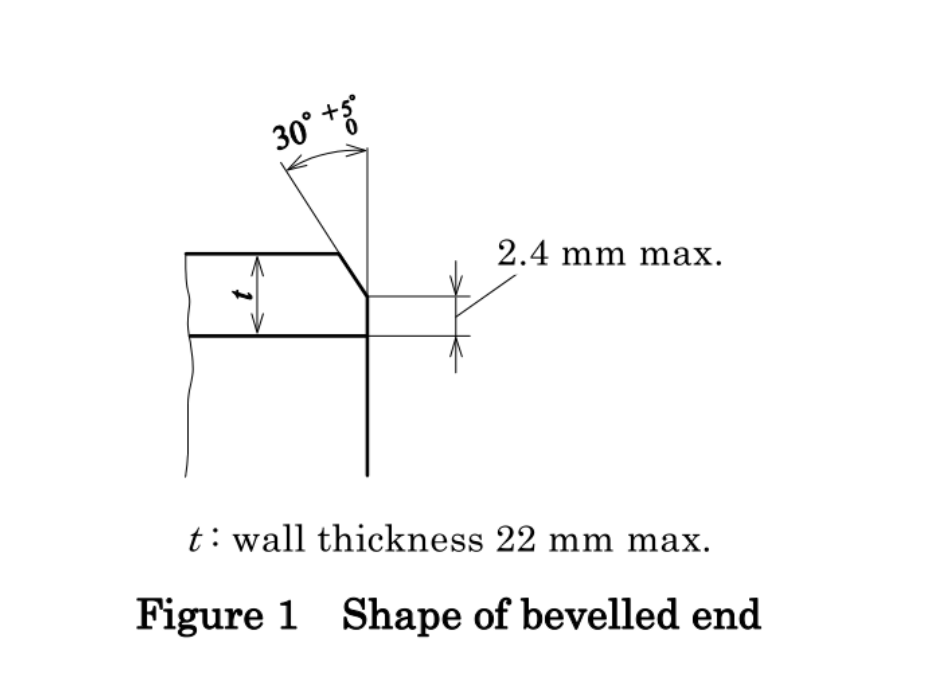
If the pipe is required to be processed into a beveled end, for wall thickness ≤ 22mm steel pipe, the angle of the bevel is 30-35°, bevel width of the steel pipe edge: is max 2.4mm.
Wall thickness greater than 22mm steel pipe sloping end, generally processed as a composite bevel, the implementation of standards can refer to the relevant requirements of ASME B36.19.

Hot Treatment
Select the appropriate heat treatment process according to the grade and manufacturing process.

Chemical Components of JIS G 3456
Chemical Composition Testing
The heat analysis method shall be in accordance with JIS G 0320.
The product analysis method shall be in accordance with JIS G 0321.
| Symbol of grade | C (Carbon ) | Si (Silicon) | Mn (Manganese) | P (Phosphorus) | S (Sulfur) |
| max | max | max | |||
| STPT370 | 0.25% | 0.10-0.35% | 0.30-0.90% | 0.035% | 0.035% |
| STPT410 | 0.30% | 0.10-0.35% | 0.30-1.00% | 0.035% | 0.035% |
| STPT480 | 0.33% | 0.10-0.35% | 0.30-1.00% | 0.035% | 0.035% |
Tolerances for Chemical Composition
Seamless steel pipes shall be subject to the tolerances in Table 3 of JIS G 0321.
Resistance-welded steel pipes shall be subject to the tolerances in Table 2 of JIS G 0321.
Tensile Test of JIS G 3456
Test Methods: The test methods shall conform to the standards in JIS Z.2241.
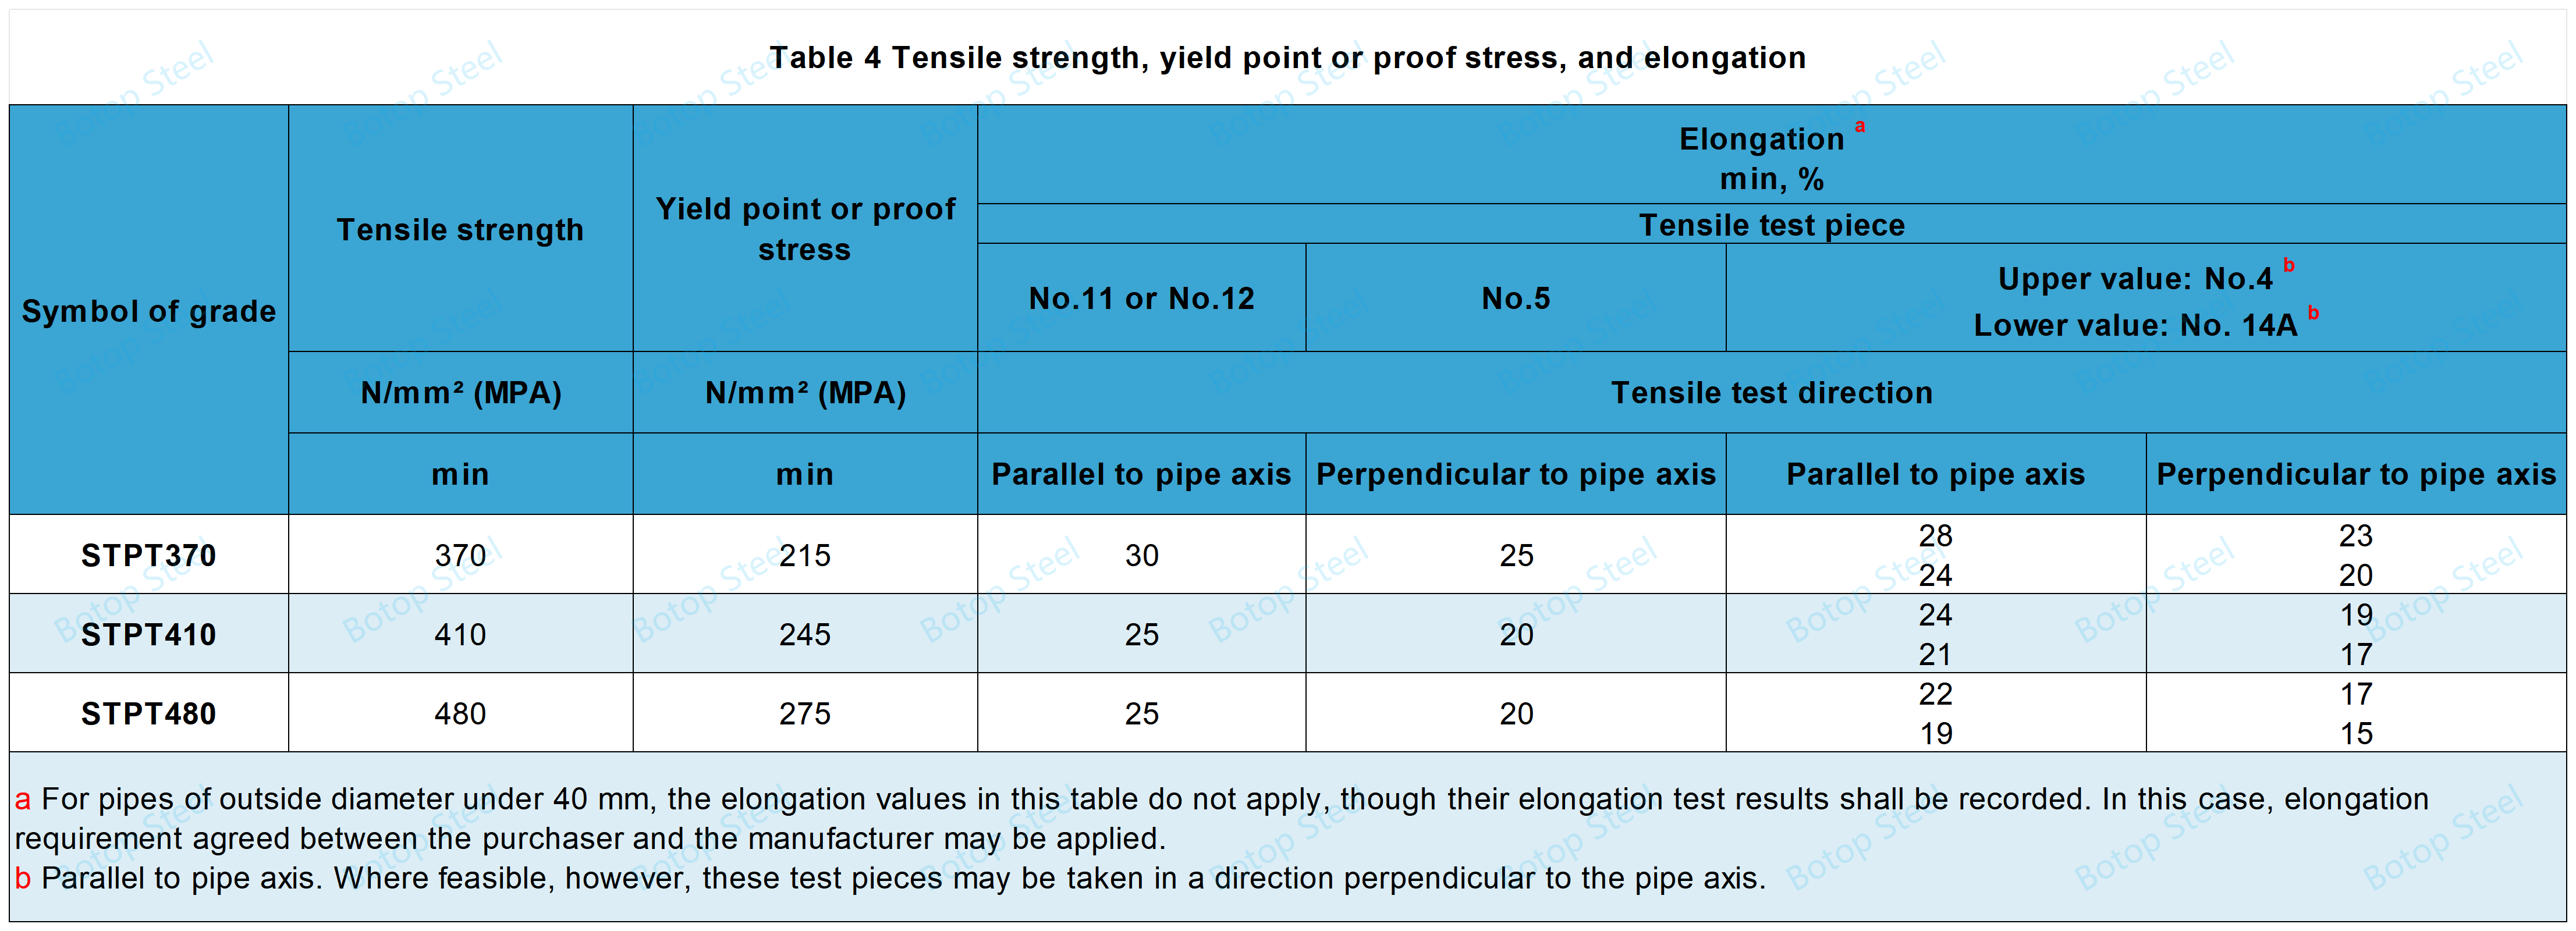
The pipe shall meet the requirements given in Table 4 for tensile strength, yield strength, and elongation.

The test piece used shall be of No. 11, No. 12 (No. 12A, No. 12B, or No. 12C), No. 14A, No. 4 or No. 5 specified in JIS Z 2241.
The diameter of Test piece No. 4 shall be 14 mm (gauge length 50 mm).
Test pieces No. 11 and No. 12 shall be taken in parallel to the pipe axis,
Test pieces No. 14A and No. 4, either in parallel or perpendicular to the pipe axis,
and Test piece No. 5, in perpendicular to the pipe axis.
Test piece No. 12 or No. 5 taken from the electric resistance welded steel pipe shall not contain the weld.
For the tensile test of pipes under 8 mm in thickness performed using Test piece No. 12 or Test piece No. 5, the elongation requirement given in Table 5 shall apply.

Flattening Experiment
At room temperature (5°C - 35°C), flatten the specimen between two platforms until it distance (H) between them reaches the specified value and then check for cracks.
H=(1+e)t/(e+t/D)
н: distance between platens (mm)
t: wall thickness of pipe (mm)
D: outside diameter of pipe (mm)
е: constant defined for each grade of pipe:
0.08 for STPT370,
0.07 for STPT410 and STPT480
Bendability Test
Bendability is applicable to pipes with an outside diameter of 60.5 mm or less.
Test method At room temperature (5°C to 35°C), bend the test piece around the mandrel until the inner radius is 6 times the outer diameter of the pipe and check for cracks. In this test, the weld should be located approximately 90° from the outermost part of the bend.
The Bendability test can also be carried out in accordance with the requirement that the inner radius is four times the outer diameter of the pipe and the bend angle is 180°.
Hydraulic Test or Nondestructive Test (NDT)
A hydraulic test or non-destructive test shall be performed on each pipe.
Hydraulic Test
Hold the pipe at least at the minimum hydraulic test pressure specified for at least 5 seconds and observe that the pipe is able to withstand the pressure without leakage.
The Hydraulic time is specified according to the steel pipe Schedule.
| Table 6 Minimum hydraulic test pressure | ||||||||||
| Nominal wall thickness | Schedule number: Sch | |||||||||
| 10 | 20 | 30 | 40 | 60 | 80 | 100 | 120 | 140 | 160 | |
| Minimum hydraulic test pressure, Mpa | 2.0 | 3.5 | 5.0 | 6.0 | 9.0 | 12 | 15 | 18 | 20 | 20 |
Nondestructive Test
If ultrasonic inspection is used, signals from reference samples containing UD-type reference standards, as specified in JIS G 0582, shall be used as alarm levels; any signal from the pipe equal to or greater than the alarm level shall be rejected. In addition, the minimum depth of square recesses for testing pipes, other than cold finishing, shall be 0.3 mm.
If eddy current inspection is used, signals from an EY type reference standard as specified in JIS G 0583 shall be used as the alarm level; any signal from the pipe equal to or greater than the alarm level shall be a reason for rejection.
Pipe Weight Chart and Pipe Schedules of JIS G 3456
Steel Pipe Weight Calculation Formula
Assume a density of 7.85 g/cm³ for the steel tube and round the result to three significant figures.
W=0.02466t(D-t)
W: unit mass of pipe (kg/m)
t: wall thickness of pipe (mm)
D: outside diameter of pipe (mm)
0.02466: conversion factor for obtaining W
Pipe Weight Chart
Pipe weight tables and schedules are important references that are commonly used in pipeline engineering.
Pipe Schedules
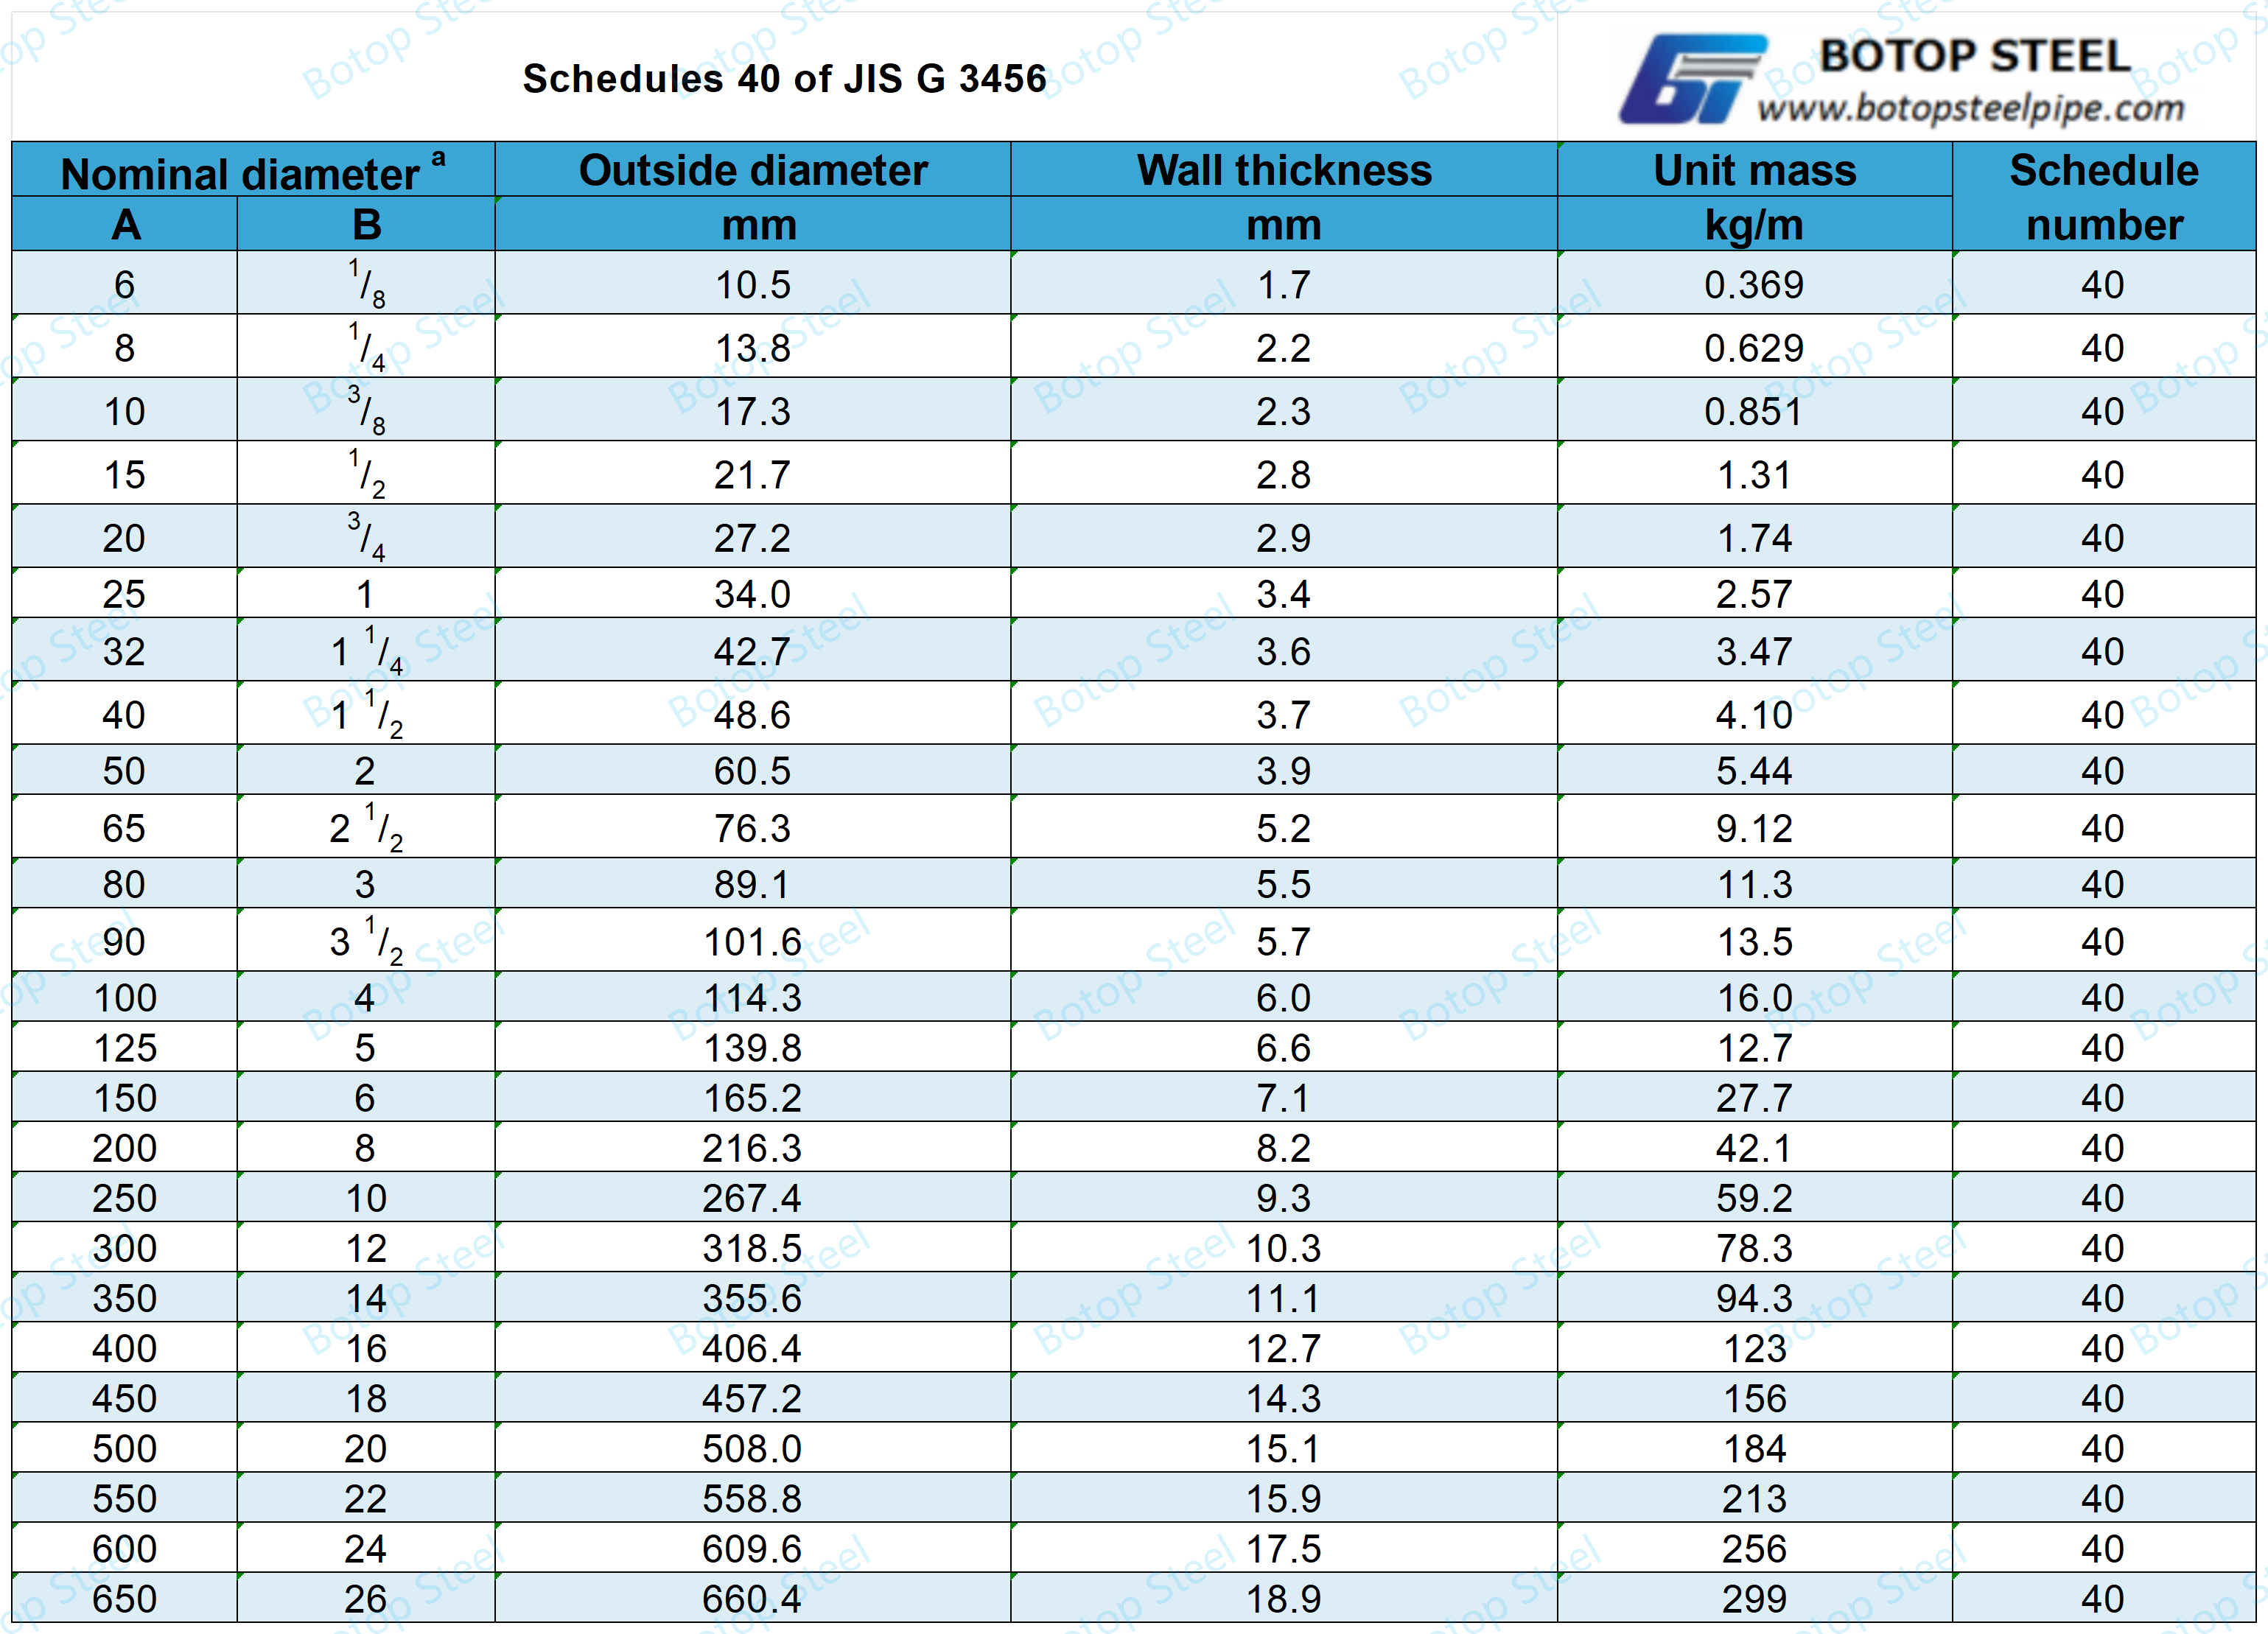
A schedule is a standardized combination of wall thickness and the nominal diameter of a pipe.
Schedule 40 and Schedule 80 steel tubes are widely used in industry and construction. They are common pipe sizes with different wall thicknesses and capacities for different application scenarios.


If you want to know more about the pipe weight table and pipe schedule in the standard, you can click to check it out!
Dimensional Tolerances

Appearance
The internal and external surfaces of the pipe shall be smooth and free from defects unfavorable to use.
The pipe shall be straight, with the ends at right angles to the axis of the pipe.
Pipes may be repaired by grinding, machining or other methods, but the repaired wall thickness shall remain within the specified tolerances and the repaired surface shall be smooth in profile.
The wall thickness of the repaired pipe shall be kept within the specified tolerances and the surface of the repaired pipe shall be smooth in profile.
JIS G 3456 Marking
Each pipe that passes inspection should be labeled with the following information. Labels may be used on bundles for small-diameter pipes.
a) Symbol of grade
b) Symbol of the manufacturing process
The symbol of the manufacturing process shall be as follows. The dashes may be replaced with blanks.
Hot-finished seamless steel pipe:-S-H
Cold-finished seamless steel pipe:-S-C
As electric resistance welded steel pipe:-E-G
Hot-finished electric resistance welded steel pipe: -E-H
Cold-finished electric resistance welded steel pipe:-E-C
c) Dimensions, expressed by nominal diameter × nominal wall thickness, or outside diameter × wall thickness.
d) Manufacturer's name or identifying brand
Example: BOTOP JIS G 3456 S-H STPT370 50A×SHC40 HEAT NO.00001
JIS G 3456 Steel Pipe Applications
JIS G 3456 steel pipe is usually used for equipment and piping systems in high-temperature and high-pressure environments, such as in boilers, heat exchangers, high-pressure steam piping, thermal power plants, chemical plants, and paper mills.
Standards Related to JIS G 3456
The following standards are all applicable to piping in high-temperature and high-pressure environments and can be used as an alternative to JIS G 3456.
ASTM A335/A335M: applicable to alloy steel pipes
DIN 17175: for seamless steel pipes
EN 10216-2: for seamless steel pipes
GB 5310: applicable to seamless steel pipe
ASTM A106/A106M: Seamless carbon steel tubes
ASTM A213/A213M: Seamless tubes and pipes of alloy steel and stainless steel
EN 10217-2: Suitable for welded tubes and pipes
ISO 9329-2: Seamless carbon and alloy steel tubes and pipes
NFA 49-211: for seamless steel tubes and pipes
BS 3602-2: for seamless carbon steel pipes and fittings
We are a high-quality welded carbon steel pipe manufacturer and supplier from China, and also a seamless steel pipe stockist, offering you a wide range of steel pipe solutions! If you want to know more information about steel pipe products, you can contact us.
Tags: JIS G 3456, SPTP370, STPT410, STPT480, STPT, suppliers, manufacturers, factories, stockists, companies, wholesale, buy, price, quotation, bulk, for sale, cost.
Post time: Apr-29-2024
