ASTM A333 for Seamless and Welded Steel Pipe;
ASTM A333 is used for low-temperature service and other applications requiring notched toughness.
Navigation Buttons
ASTM A333 Grade and Minimum Service Temperature
Heat Treatment
ASTM A333 Test
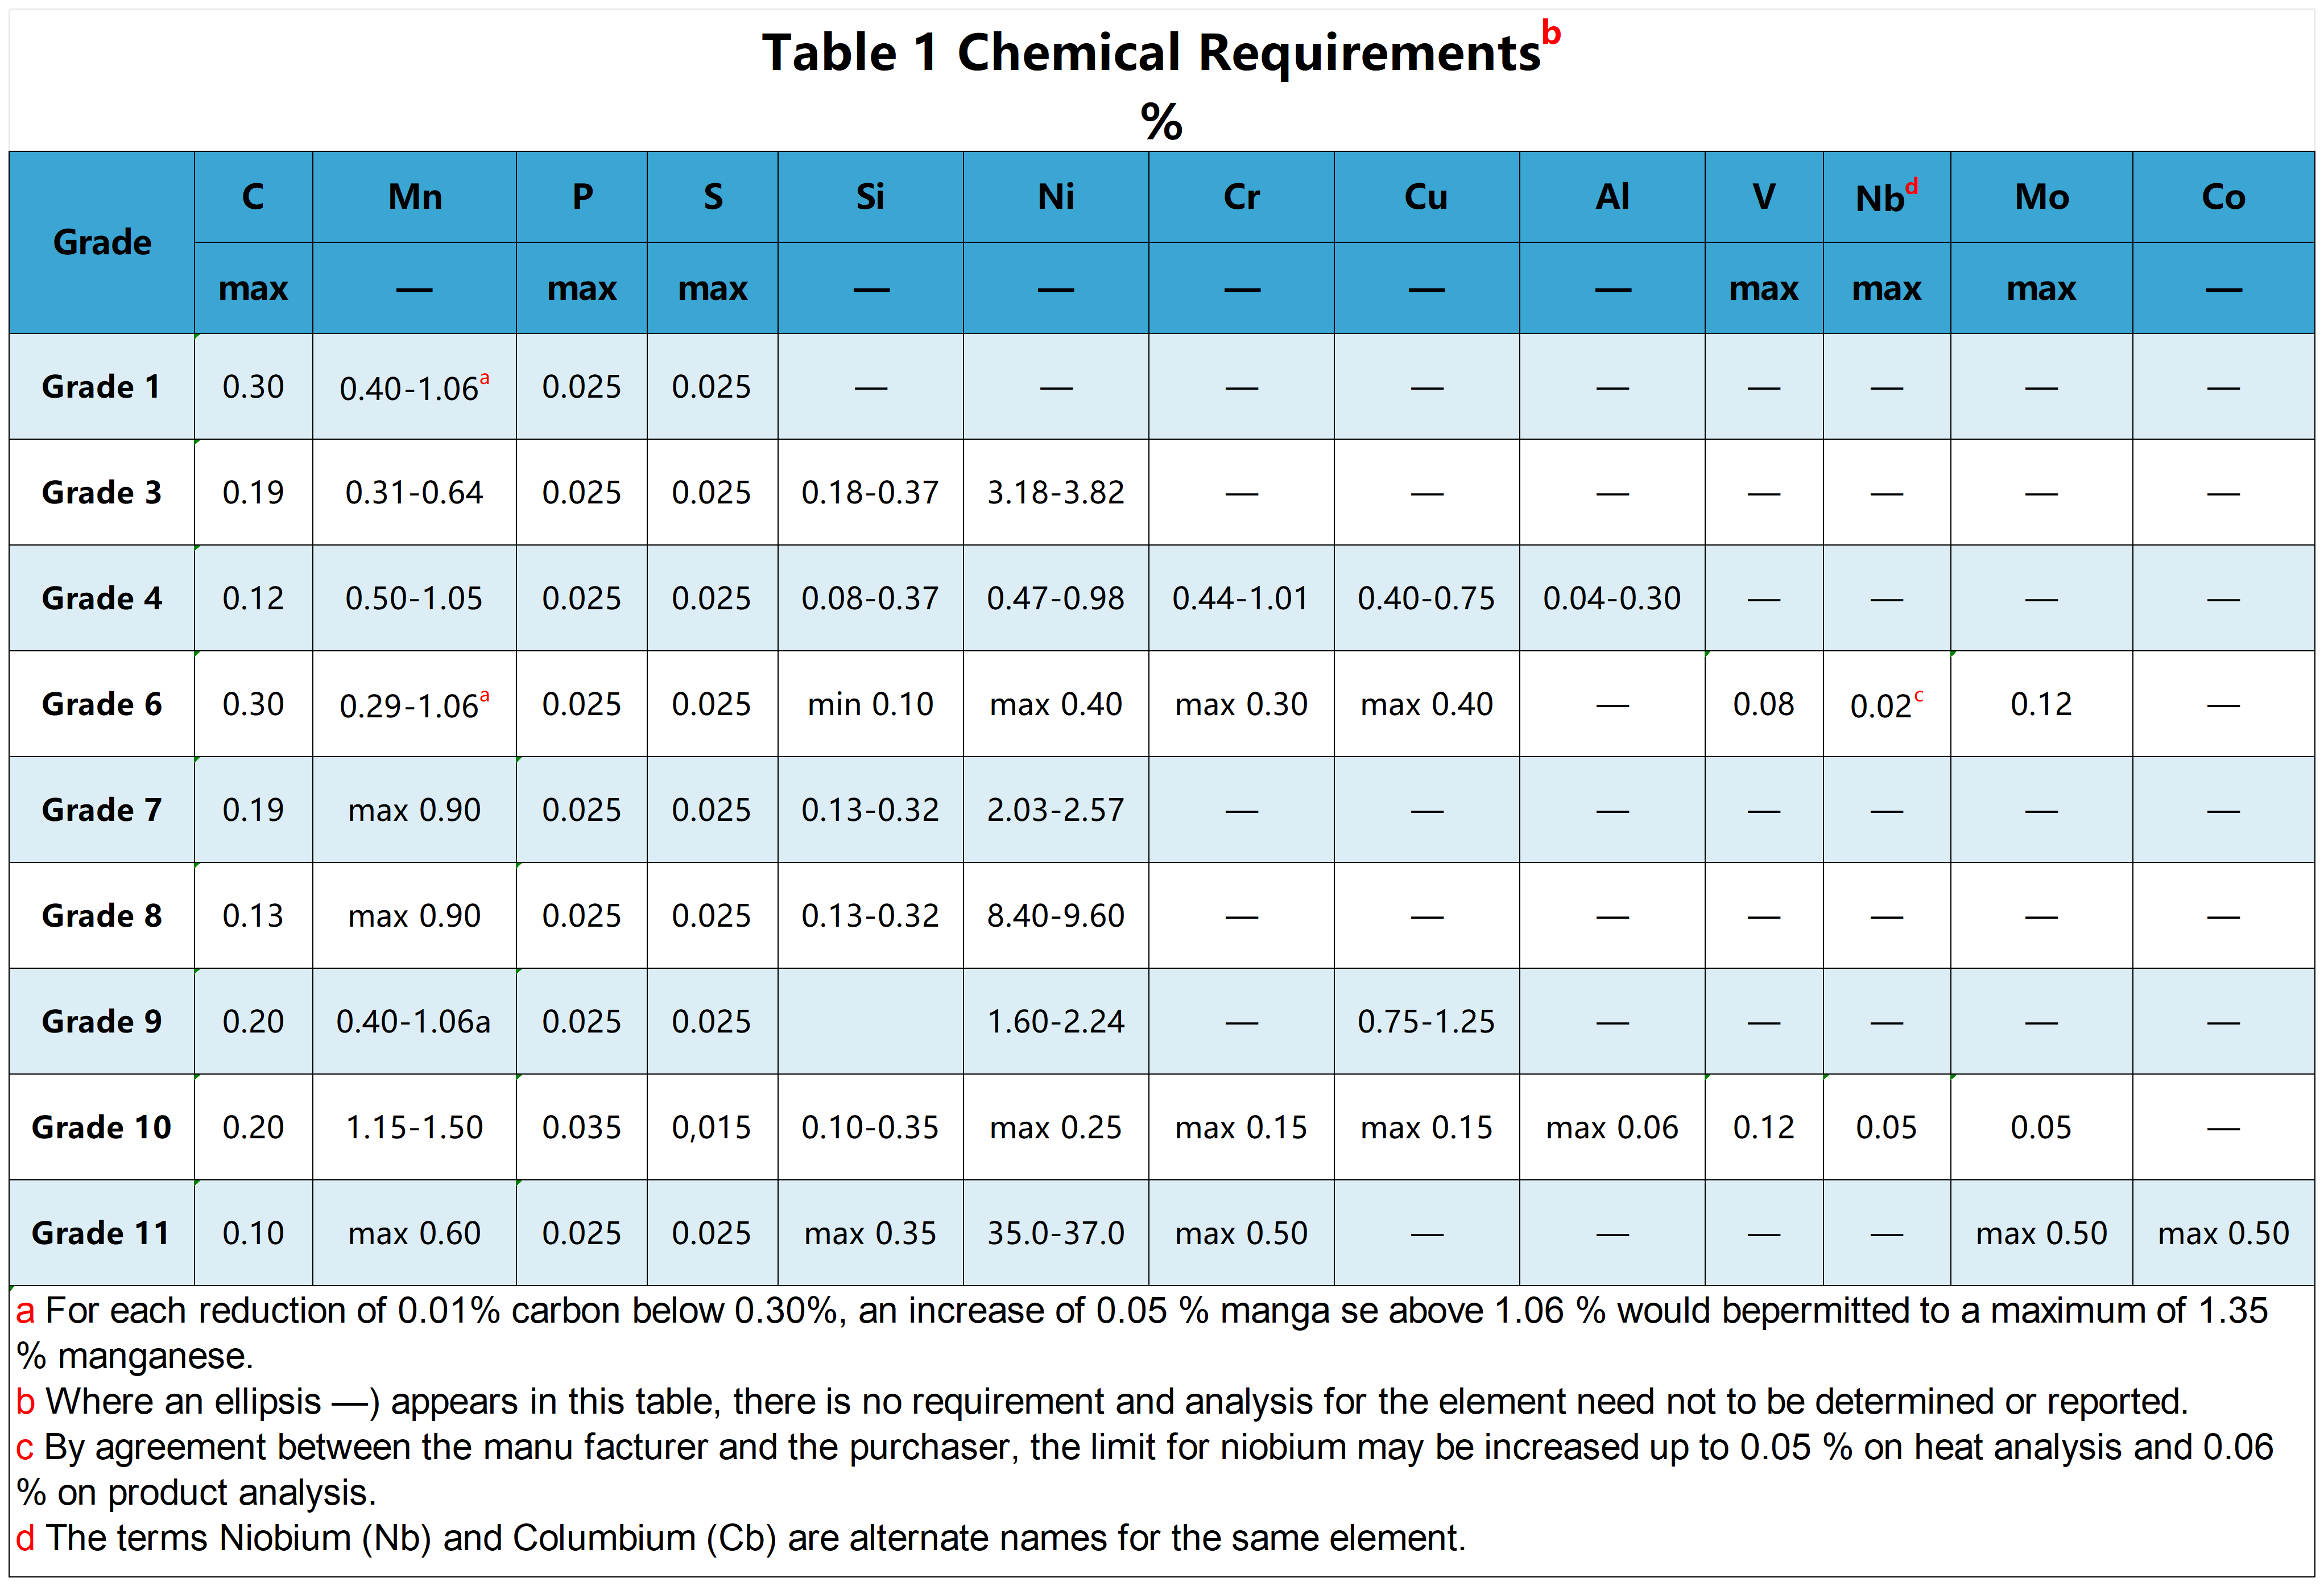
Chemical Components
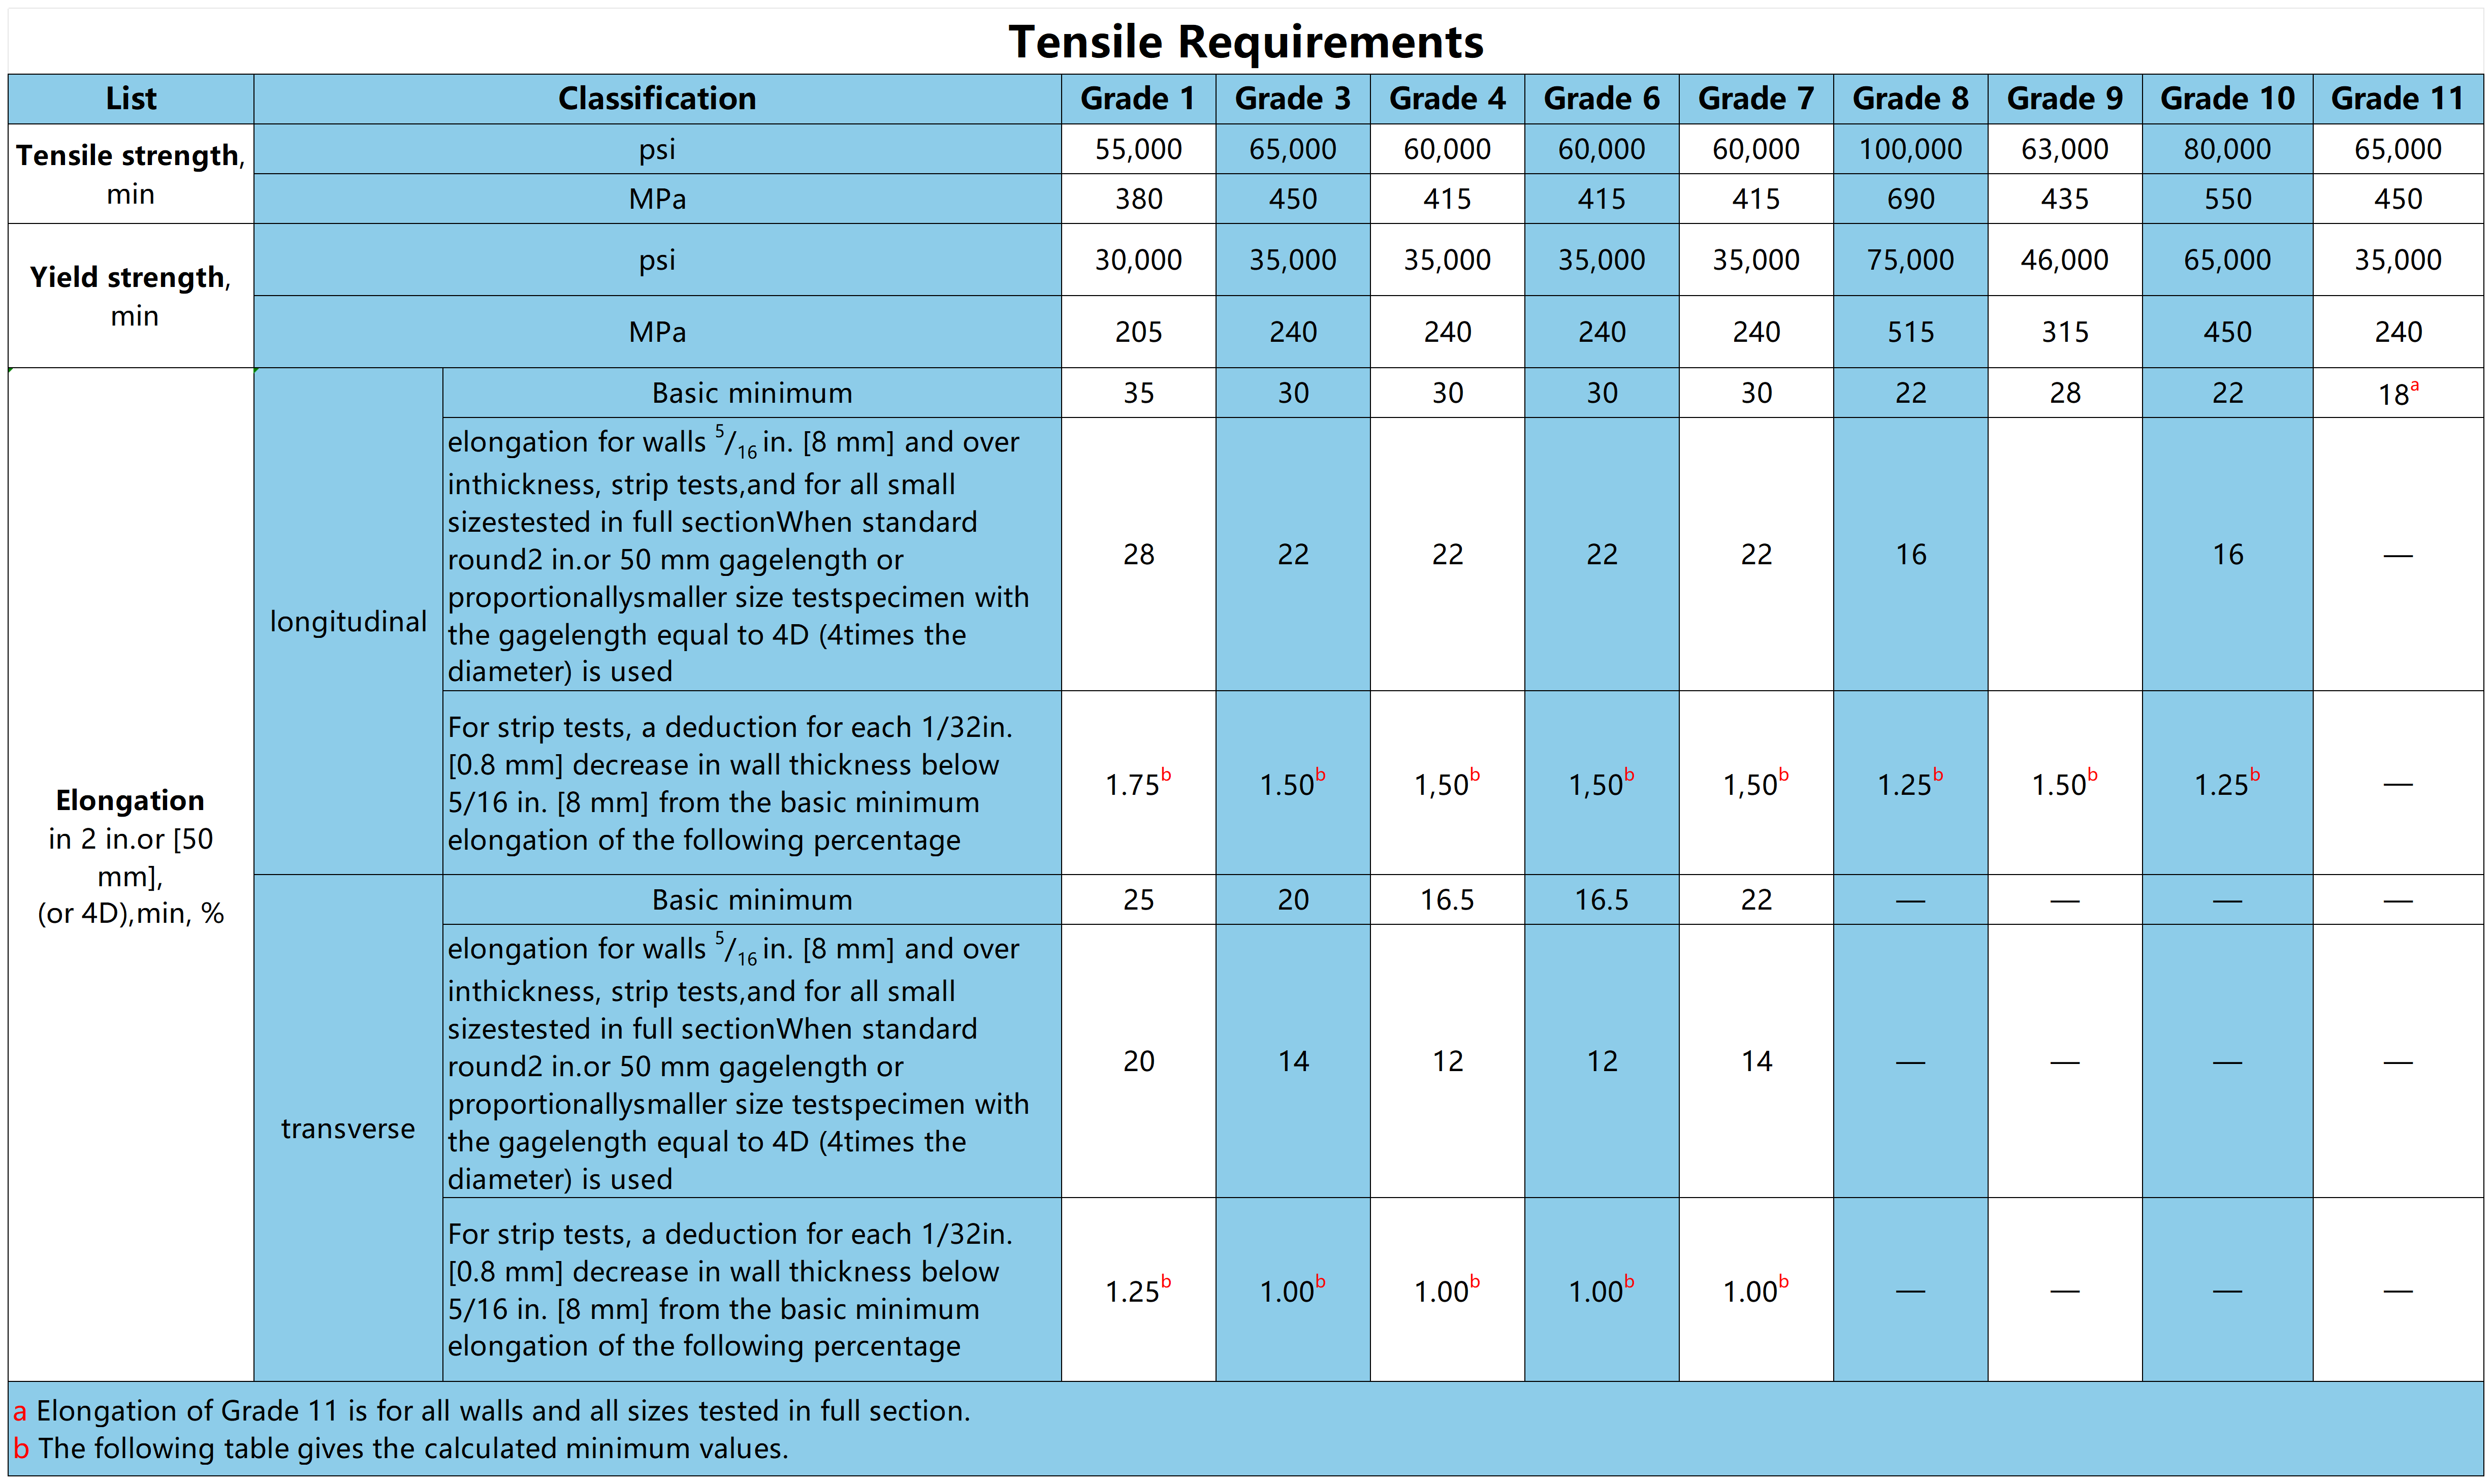
Tensile Requirements
Impact Test
Hydrostatic or Nondestructive Electric Test
ASTM A333 Appearance Size and Deviation
Outside Diameter
Wall Thickness
Weight
Length, Straightness and Ends
Defect and Handling
ASTM A333 Marking
ASTM A333 Relevant Standards
ASTM A333 Grade and Minimum Service Temperature
ASTM A333 Grade 1:-50°F (-45°C)
ASTM A333 Grade 3:-150°F (-100°C)
ASTM A333 Grade 4:-150°F (-100°C)
ASTM A333 Grade 6:-50°F (-45°C)
ASTM A333 Grade 7:-100°F (-75°C)
ASTM A333 Grade 8:-320°F (-195°C)
ASTM A333 Grade 9:-100°F (-75°C)
ASTM A333 Grade 10:-75°F (-60°C)
ASTM A333 Grade 11:-320°F (-195°C)
Note: ASTM A333 Grade 4 can only be seamless tubes.
ASTM A333 Grade 11 pipe can be produced by welding with or without the addition of filler metals.
Heat Treatment
Reference to ASTM A333 Section 4.3.
ASTM A333 Test
Chemical Components

Tensile Requirements

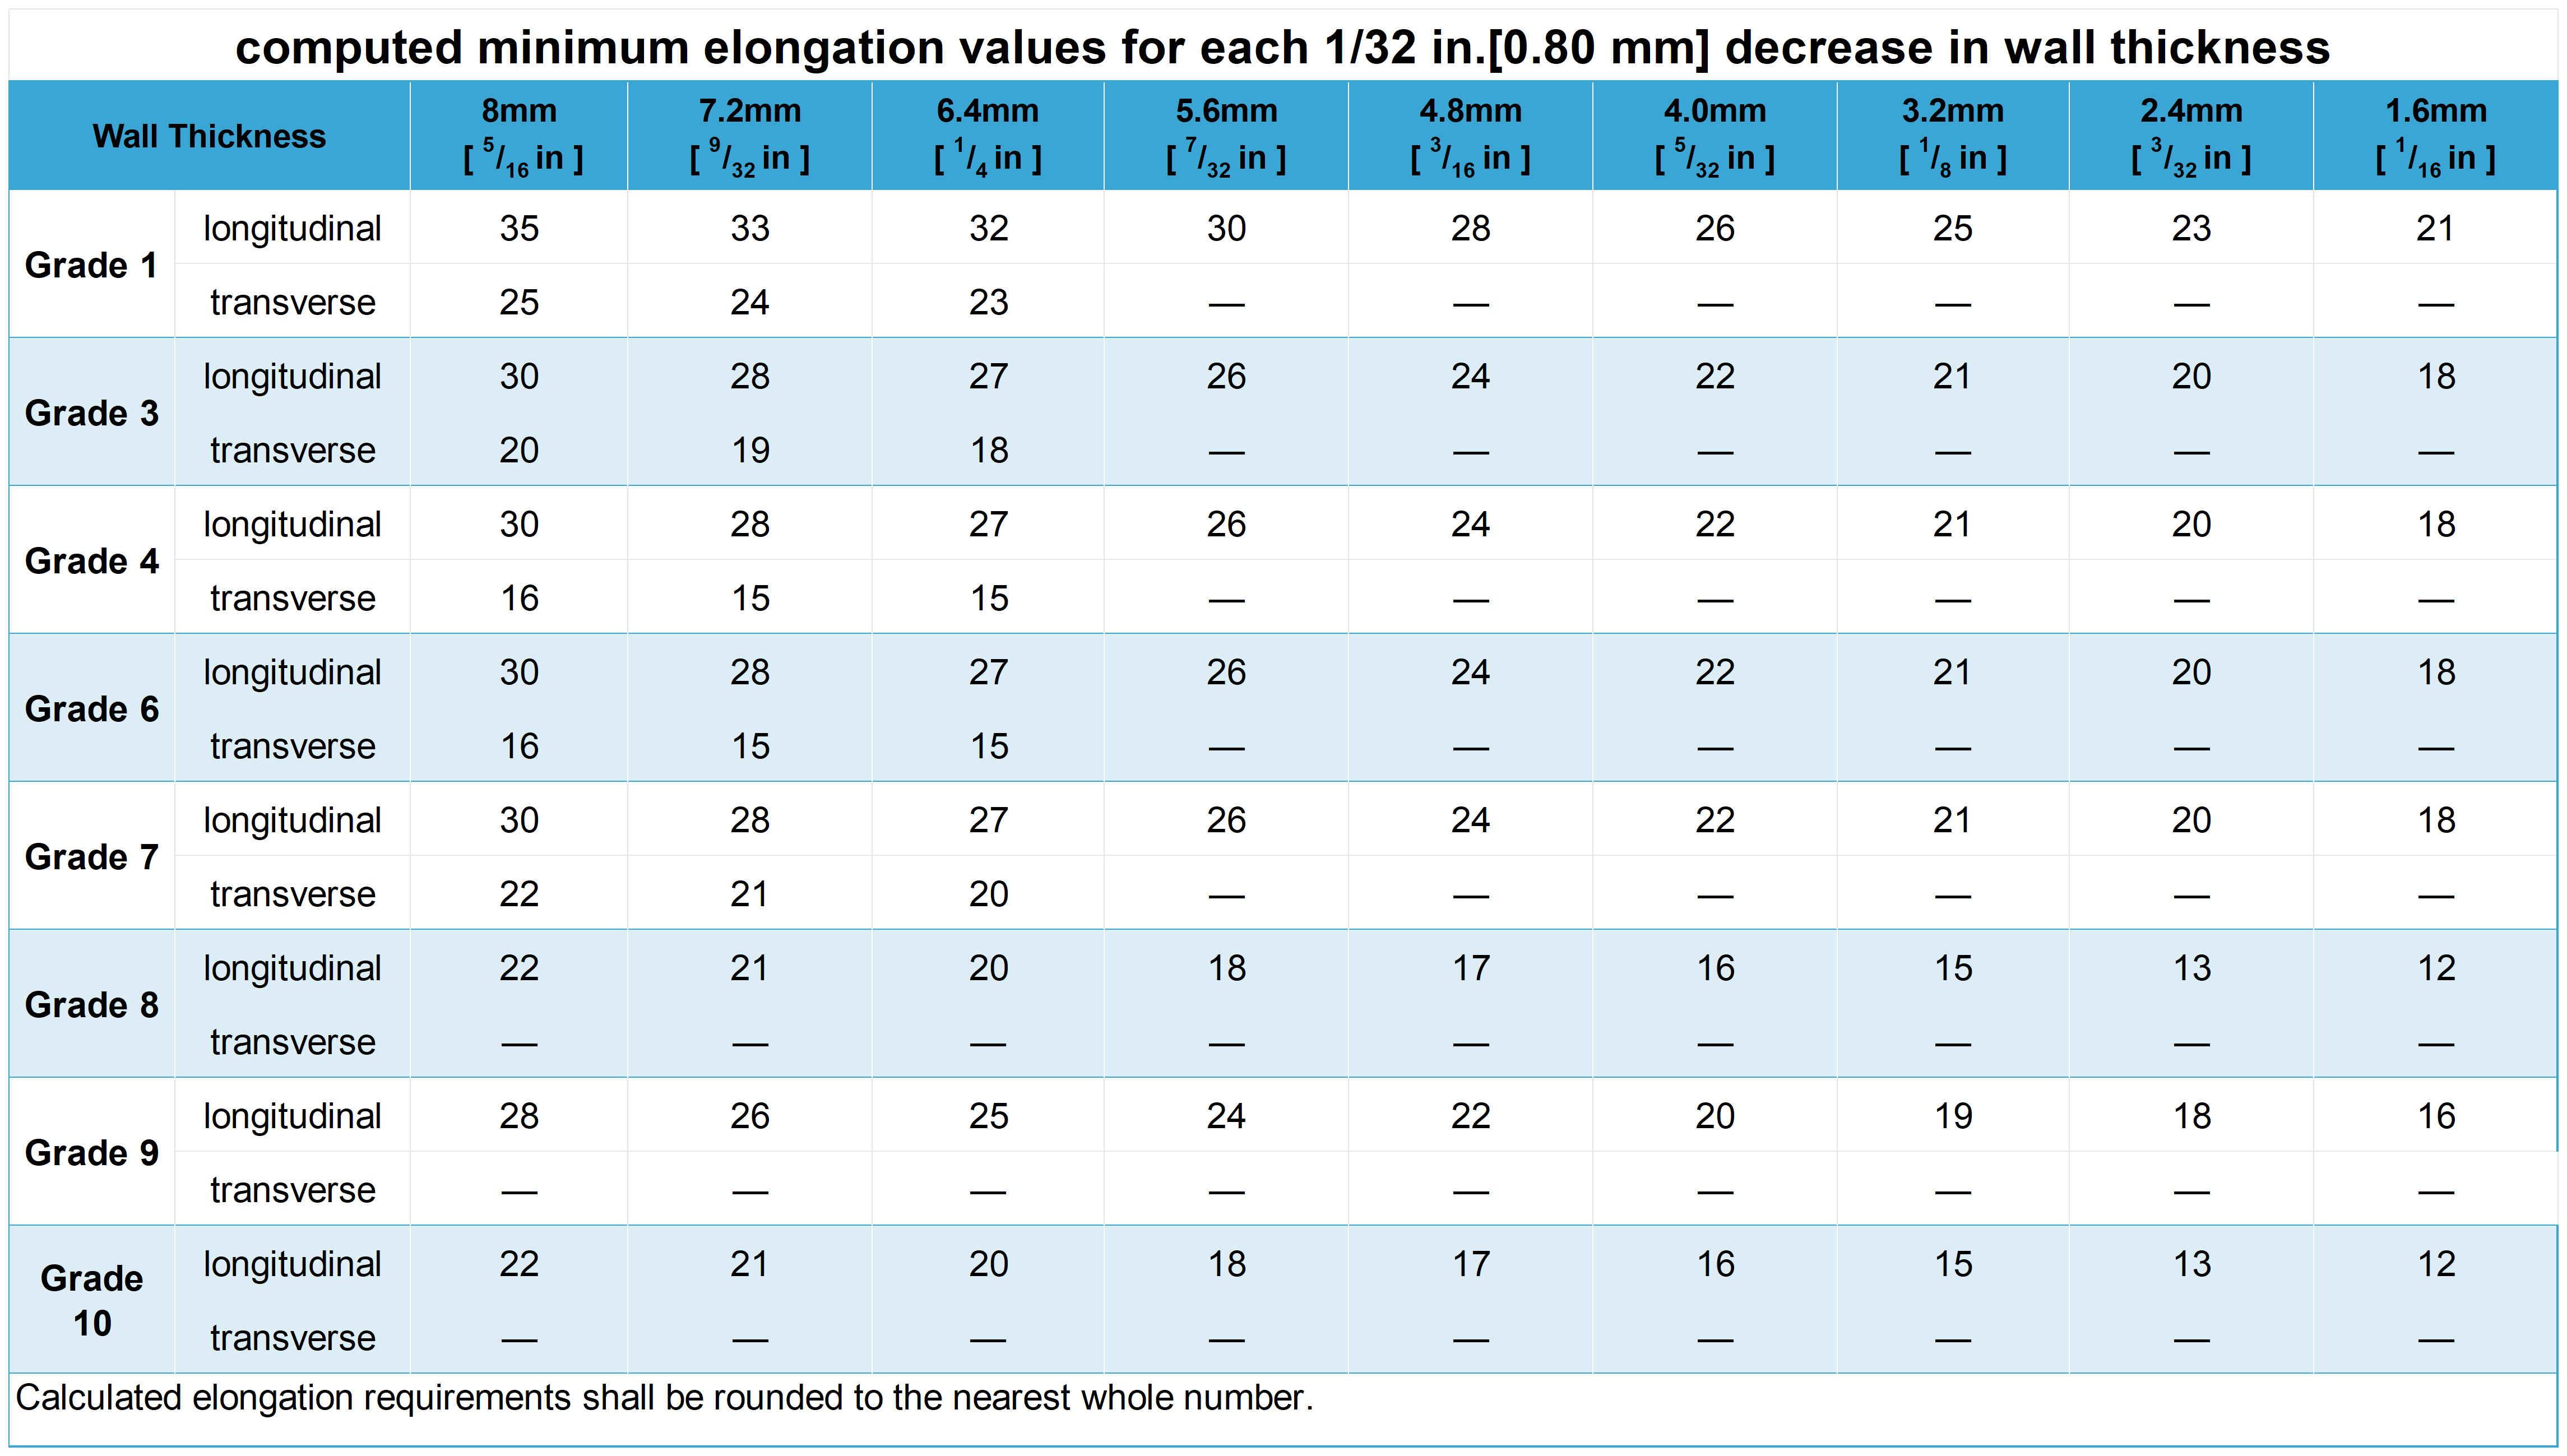
ASTM A333 also specifies a minimum elongation value for each 1/32 inch [0.80 mm] reduction in wall thickness.

Impact Test
| TABLE 3 Impact Requirements for Grades 1, 3, 4, 6, 7, 9, 10, and 11 | ||||
| Size of Specimen, mm | Minimum Average Notched Bar Impact Value of Each Set of Three Specimens |
Minimum Notched BarImpact Value of OneSpecimen Only ofa Set |
||
| ft.lbf | J | ft.lbf | J | |
| 10 by 10 | 13 | 18 | 10 | 14 |
| 10 by 7.5 | 10 | 14 | 8 | 11 |
| 10 by 6.67 | 9 | 12 | 7 | 9 |
| 10 by 5 | 7 | 9 | 5 | 7 |
| 10 by 3.33 | 5 | 7 | 3 | 4 |
| 10 by 2.5 | 4 | 5 | 3 | 4 |
Hydrostatic or Nondestructive Electric Test
Test Method: ASTM A999/A999M.
Each pipe shall be subjected to a non-destructive electrical test or hydrostatic test.
ASTM A333 Appearance Size and Deviation
Outside Diameter
| Table 3 Impact Requirements for Grades 1, 3, 4, 6, 7, 9, 10, and 11 | ||||
| Size of Specimen, mm |
Minimum Average Notched Bar Impact Value of Each Set of Three Specimens |
Minimum Notched BarImpact Value of OneSpecimen Only ofa Set |
||
| ft.lbf | J | ft.lbf | J | |
| 10 by 10 | 13 | 18 | 10 | 14 |
| 10 by 7.5 | 10 | 14 | 8 | 11 |
| 10 by 6.67 | 9 | 12 | 7 | 9 |
| 10 by 5 | 7 | 9 | 5 | 7 |
| 10 by 3.33 | 5 | 7 | 3 | 4 |
| 10 by 2.5 | 4 | 5 | 3 | 4 |
Wall Thickness
| Permitted Variations in Wall Thickness | ||
| sort | Permitted Variations in Wall Thickness | Permitted Variations in Wall Thickness for MinimumWall |
| 1/8 [DN 6] to 2 1/ 2[DN 65] incl., all t/D ratios |
87.5% ~ 120% | 100%~132.5% |
| 3 [DN 80] to 18 [DN 450] incl., t/D up to 5% incl. |
87.5% ~ 122.5% | 100%~135% |
| 3 [DN 80] to 18 [DN 450] incl., t/D > 5% incl. |
87.5% ~ 115% | 100%~127.5% |
| 20 [DN 500] and larger, welded, all t/D ratios |
87.5% ~ 117.5% | 100%~130% |
| 20 [DN 500] and larger, seamless, t/D up to 5 % incl. |
87.5% ~ 122.5% | 100%~135% |
| 20 [DN 500] and larger, seamless, t/D >5% | 87.5% ~ 115% | 100%~127.5% |
Weight
Weight tables and schedules for specified outside diameters and specified wall thicknesses for steel pipe use ASME B36.10.
Length, Straightness and Ends
| List | Sort | Scope |
| Length a | Length ≤ 24 ft [7.3m] | 1/4 in. [6mm] |
| Length > 24 ft [7.3m] | agreement | |
| Straightness | The finished pipe shall be reasonably straight. | |
| Ends | Unless otherwise specified, the pipe shall be furnished with plain ends. All burrs at the ends of the pipe shall be removed. | |
| a If a definite length is not required, 1. order a single random length of pipe from 16 to 22 feet, with a maximum of 5% of the length between 12 and 16 feet; 2. order a double random length of pipe with a minimum average length of 35 feet and an absolute minimum length of 22 feet, with a maximum of 5% of the length between 16 and 22 feet. |
||
Defect and Handling
Defect
Surface imperfections that penetrate more than 12% of the nominal wall thickness or exceed the minimum wall thickness shall be considered defects,
and visual defects found to be more than 5% deeper than the nominal wall thickness are commonly referred to as scabs, seams, laps, tears, or slices.
Defect Handling
Defects may be eliminated by grinding, provided the remaining wall thickness is within specified limits and a smooth curved surface is maintained.
Sections of pipe containing defects may be cut within the limits of the length requirement.
ASTM A333 Marking
The manufacturer's name or brand, specification number (year of issue is not required), and grade should be clearly identified.
It should also include the temperature at which the impact test was performed after hot working, cold drawing, seamless or welded, the program number, and the letters "LT".
Markings shall begin at approximately 12 inches [300 mm].
For pipe less than NPS 2 and pipe less than 3 feet [1 m] in length, the required information may be marked on a label on the bundle or box in which the pipe is transported.
ASTM A333 Relevant Standards
EN 10216-4: European standard covering technical conditions for non-alloyed and alloyed steel tubes for cryogenic service.
ISO 9329-3: International Organization for Standardization standard for seamless steel tubes for cryogenic service.
DIN EN 10216-4: European standard adopted by Germany, identical to EN 10216-4, for seamless steel tubes for pressure purposes in cryogenic service.
JIS G3460: Alloy steel tubes for cryogenic service.
GB/T 18984: Seamless steel tubes for cryogenic service from -45°C to -195°C.
BS 3603: Carbon and alloy steel tubes designed for cryogenic service.
CSA Z245.1: Standard for steel tubes and pipes developed by the Canadian Standards Association, including specifications for use in cryogenic service.
GOST 8731: Seamless hot-rolled steel tubes and pipes for cryogenic service.
Botop Steel is a China Professional Welded Carbon Steel Pipes Manufacturer& Supplier of Over 16 Years with 8000+ Tons of Seamless Linepipe in Stock Each Month.
We can provide you with good quality and low-price carbon steel pipe products, offer you many kinds of steel pipe solutions, If you have any demands, please contact us!
tags:astm a333,astm a333 grade,astm a333 grade 6, suppliers, manufacturers, factories, stockists, companies, wholesale, buy, price, quotation, bulk, for sale, cost.
Post time: Mar-28-2024
